2.2.2.3 Choose Destination
You can choose a folder for the output and a filename for the created file.
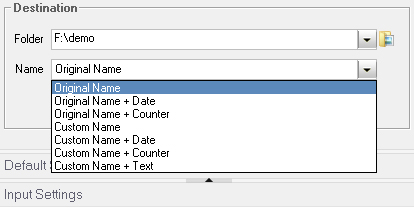
Folder: You can choose the Original Folder as the destination folder, or choose another custom folder.
Name: You have following options:
1. Original Name: The output filename has the same prefix of original file, but the suffix depends on the output format. For example, if you want to convert mypicture.bmp to JPG format, then output filename will be mypicture.jpg.
2. Original Name + Date: The system date number will be inserted into output filename. For example, mypicture_09-10_2012.jpg.
3. Original Name + Counter: A counter number will be inserted into output filename. If there are 5 files to be converted, then the counter will be 001 to 005.
4. Custom Name: You can directly enter your filename into the textbox.
5. Custom Name + Date: You can directly enter your filename into the textbox, and the system date number will be inserted into filename.
6. Custom Name + Counter: You can directly enter your filename into the textbox, and a counter number will be inserted into filename.
7. Custom Name + Text: Graphics Converter Pro will build the filename with what you enter into two textboxes. For example, mypicture_abc.jpg.
The last Option allows you to choose how to process if the output file already exists. If you choose Rename, then Graphics Converter Pro will insert a counter number into your filename, the counter will increase gradually until there is no file with the same name in the output folder. For example, if there are mypicture.png and mypicture_001.png existing, then the output filename will be mypicture_002.png.